Instructions
VDO.ninja is a great, free resource for video sharing. This guide is written toward Windows machines.
Full details of VDO.ninja can be found on the main website.
This tutorial uses a companion app created by the same individual as vdo.ninja called Electron Capture app. This app provides an easy, clean interface to capture the video stream for OBS.
https://github.com/steveseguin/electroncapture
https://github.com/steveseguin/electroncapture#links-to-downloads-below
Use Case
I play and stream a VTT RPG with friends. In the stream, each players camera is captured and displayed separately. These cameras can be captured individually, and positioned independently.
Step 1: Download and install the Electron Capture App
- The latest version of the Electron capture app can be found on the releases page. https://github.com/steveseguin/electroncapture/releases/
- Download the elecap_win_installer.zip file.
- Extract the file contents, and run the installer included.
Add the folder path to PATH variable
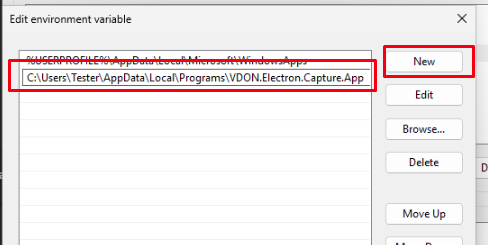
Once the applicaiton is installed, you must add the applications folder path to your PATH environment variable. To do this, first find the correct install location of the Electron capture app. You can get this by right clicking on the shortcut and clicking properties. Copy the path in the "Start in:" field. In my example image below, the path is:
"C:\Users\Tester\AppData\Local\Programs\VDON.Electron.Capture.App" Your install location may be different.
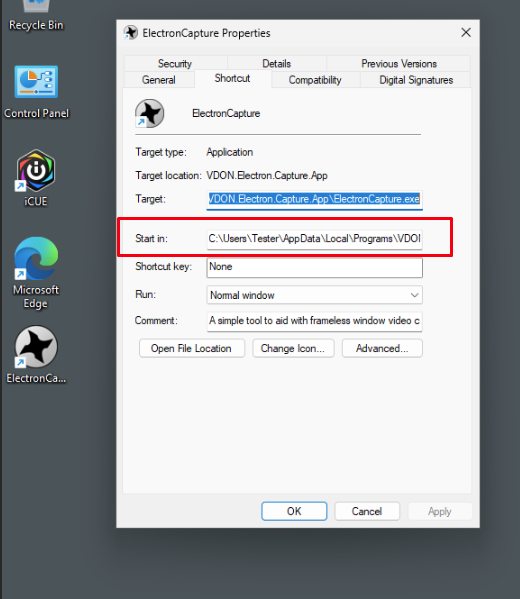
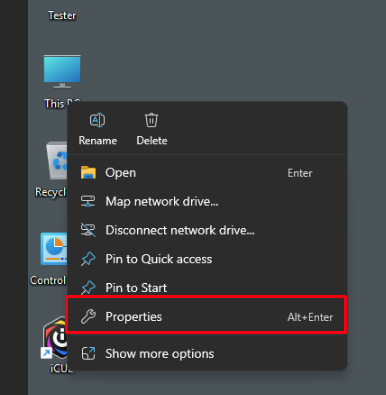
To add this to your PATH environment variable, right click on "This PC" and select properties. Select "Advanced System Settings"
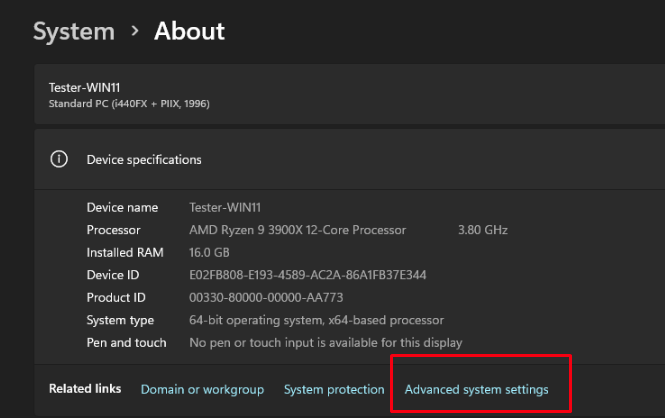
In the System Properties window, select the Advanced tab, then select "Environmental Variables"
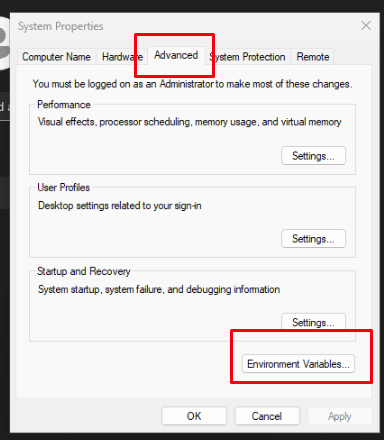
Select the Path variable, and click Edit
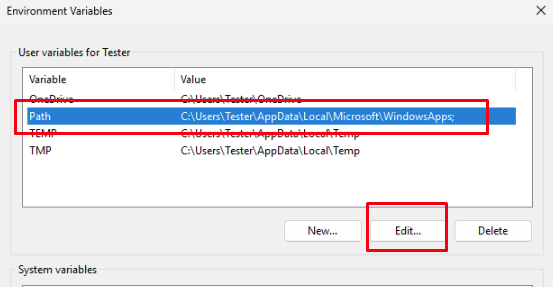
Select "New" and, in the line, paste in the Electron Capture App path you copied earlier. Then select Ok, OK, OK to close all the windows.
Step 2: Download the sample files for personal editing
- Download the sample files https://mattekure.com/vdo/vdoninjatutorial.zip
- Extract the contents of the file. There should be two (2) files included.

Step 3: Prepare URLs
Next, you will generate the URLs and BAT files that will be used. First, you will need to come up with a "Room Name". This room name should be unique, and willbe a combination of letters and numbers. No spaces or special characters. In order to avoid collision with other potential streamers, you can make the room name obscure such as "MyTestRoom0203875891058fhskdjfh".
Next you will need to generate 1 unique username for each individual that will be on camera. Each participant requires their own unique username. The username may consist of letters and numbers, no spaces or special characters.
For the purposes of this tutorial, we have created a single user named Participant1, but you can create as many as you like, as long as their usernames are unique.
Generate participant URLs
Open the Participant Links.txt document. The document consists of a single URL for Participant1. I will explain the different parts of the URL below.
First, edit the room name in the URL. This is found in the section "r=Room1". Change Room1 to your unique room name. For example, if we are selecting the obscure room above, it should look like this "r=MyTestRoom0203875891058fhskdjfh" with the entire URL looking like https://vdo.ninja/?r=MyTestRoom0203875891058fhskdjfh&push=Participant1&ad=0&wc&as&showlist=0&noheader
To create additional links, copy the link, and change the name of the participant in the "push=Participant1" section. For example, you can have several different participants like this.
Participant 1: https://vdo.ninja/?r=MyTestRoom0203875891058fhskdjfh&push=Participant1&ad=0&wc&as&showlist=0&noheader
Participant 2: https://vdo.ninja/?r=MyTestRoom0203875891058fhskdjfh&push=Participant2&ad=0&wc&as&showlist=0&noheader
Participant 3: https://vdo.ninja/?r=MyTestRoom0203875891058fhskdjfh&push=Participant3&ad=0&wc&as&showlist=0&noheader
Note that the room name stays the same for all URLs, only the participant username changes.
Other than the room and username, all of the rest of the URL fields are optional. I have included them to optimize the streaming process. There are many more options available which can be studied on the vdo.ninja documentation website, linked above. Options in the URL are separated by the "&" symbol. The options I included are:
"r=Room1" This parameter sets the room for all participants to join. All participants must use the same Room name.
"push=Participant1" This is the username or streamID you wish to publish your video under. It must be unique
"ad=0" This option disables the audio source. For my streams, we connect via Discord to provide audio, so I disable any audio to avoid double playback
"wc" This automatically selects the Share your Camera option. The intent of this connection is to share webcams, so I preselect this so someone isnt sharing their computer screen instead.
"as" Auto starts when the camera is ready
"showlist=0" disables the list of hidden guests
"noheader" Hides the top header-bar.
Generate batch file for each participant
For the streamer, we will generate a series of BAT files which will launch the Electron Capture app with a single window, containing the video stream of a single participant.
First, edit the Participant Camera.bat file in a text editor like Notepad++. It should look something like this:

Edit the roomname line to use the roomname selected for all of the participant URLs. Using the example above, it would look like:
set roomname=MyTestRoom0203875891058fhskdjfh
Save this file and close it. Create a duplicate of this file for each participant.
In each copy of the BAT file, edit the username line with the participant name that was selected in the participant url links.
Save each copy. As a reminder, each BAT file should have the SAME roomname, but unique usernames.
URL Line
The URL line should not be modified. The URL contains only 3 options, all of which are required
"view=%username%" This option selects the username defined above to be included in the URL.
"room=%roomname%" This option selects the room name defined above to be included in the URL.
"scene" This option defines the link to be treated like a scene and optimizes it as such.
Electron Capture Options
The BAT file also includes a few options that I will explain below.
"-t %username%" This sets the title of the window to be the same as the Username of the participant. This is later used as a window title reference in OBS. (Required)
"-w 640" This sets the window width to 640. (optional)
"-h 360" This sets the window height to 360 (optional)
"a 1" Enables hardware acceleration if available (optional)
"n 1" Enables Node-integration (optional)
"-u %url%" This passes the URL generated earlier in the script to Electron Capture App. (Required)
Test Functionality
To test the functionality, make sure all the URLs are correctly formatted, and the BAT files are edited and saved as defined above.
Open a participant URL link in any browser.
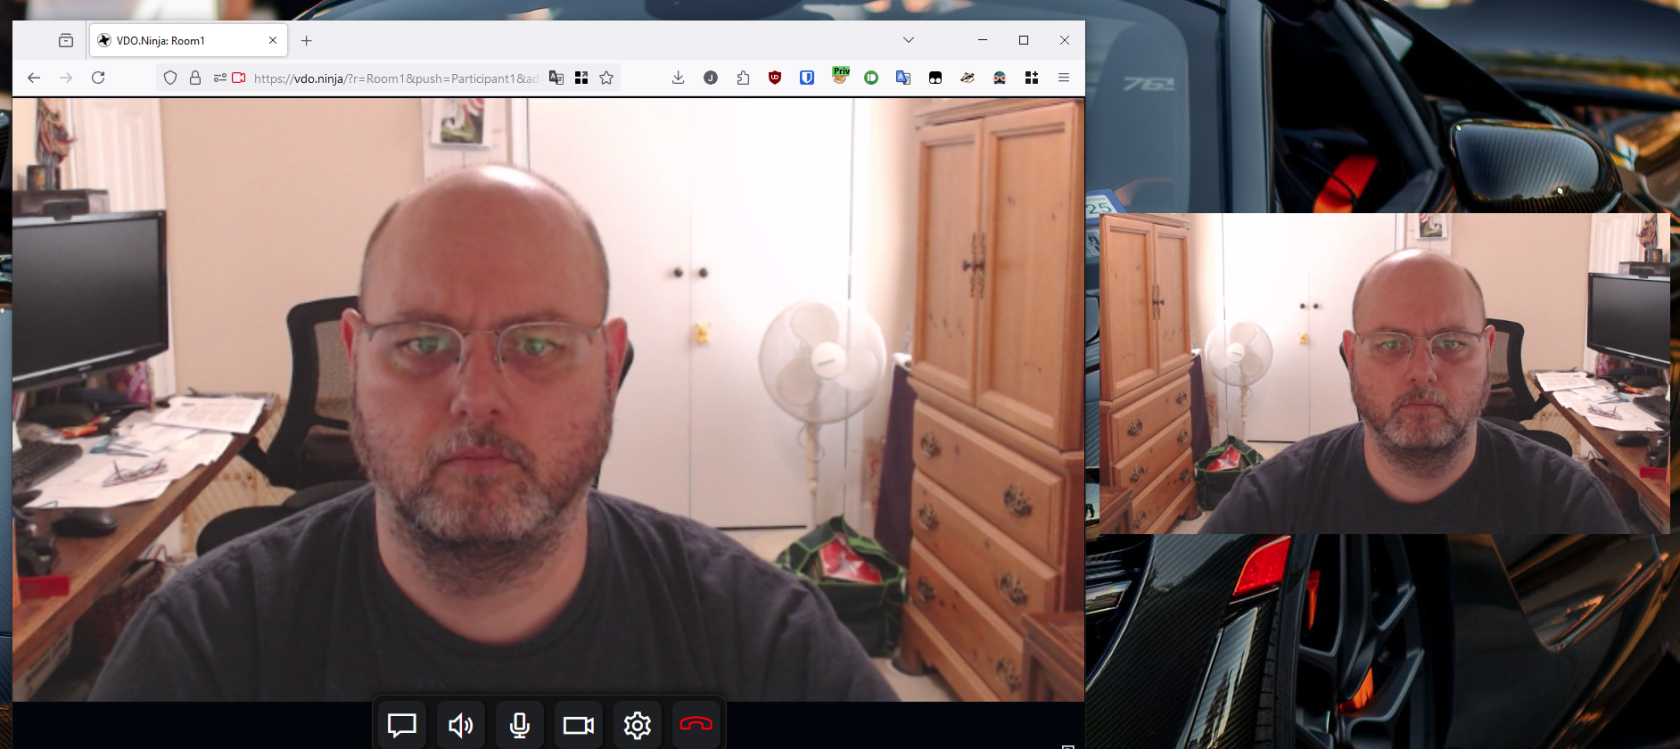
Double Click the corresponding BAT file. The browser window should show the webcam video, and the electron capture window should appear, with the single user being displayed. The image on the left shows the browser window. If more than one participant joins, all of the participants will be tiled across the single browser window. The smaller image to the right shows the Electron Capture window which will be sourced in OBS. Notice it has no title bar, or other distracting overlays. It is the pure camera feed.
Sourcing the video in OBS
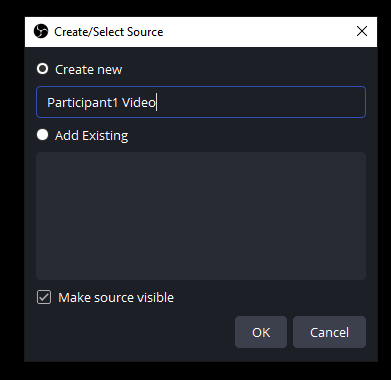
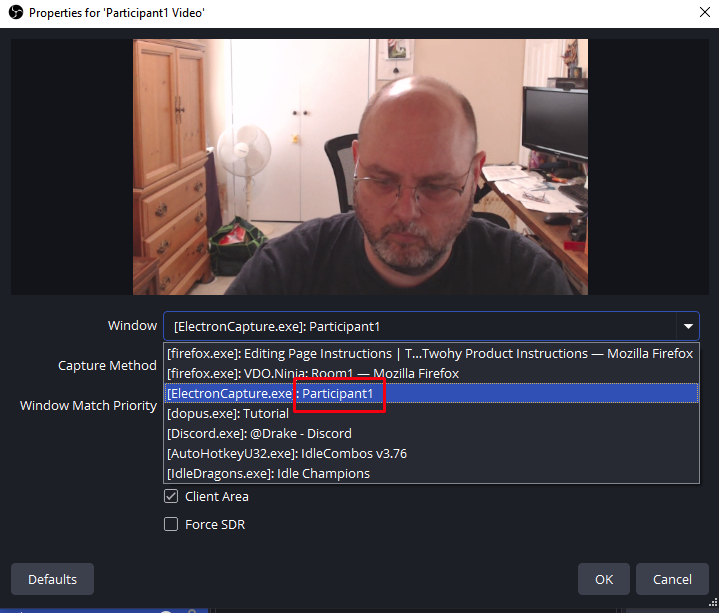
To add the Electron Capture app video window as a source in OBS, first add a Window Capture source. It is easiest to do this while the electron capture window is open and assign it a name that is the same as the username.
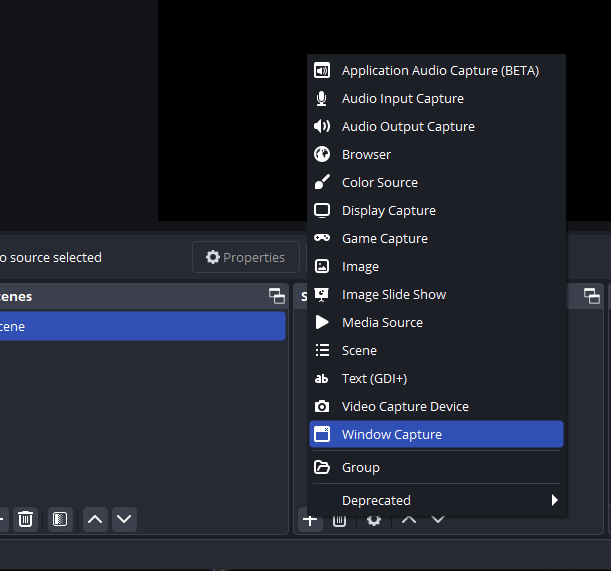
Select the electron capture app window with the title of the participant.
Then click OK to add the source. Do this once for each participant, making sure that the corresponding participant BAT file is currently open and running.
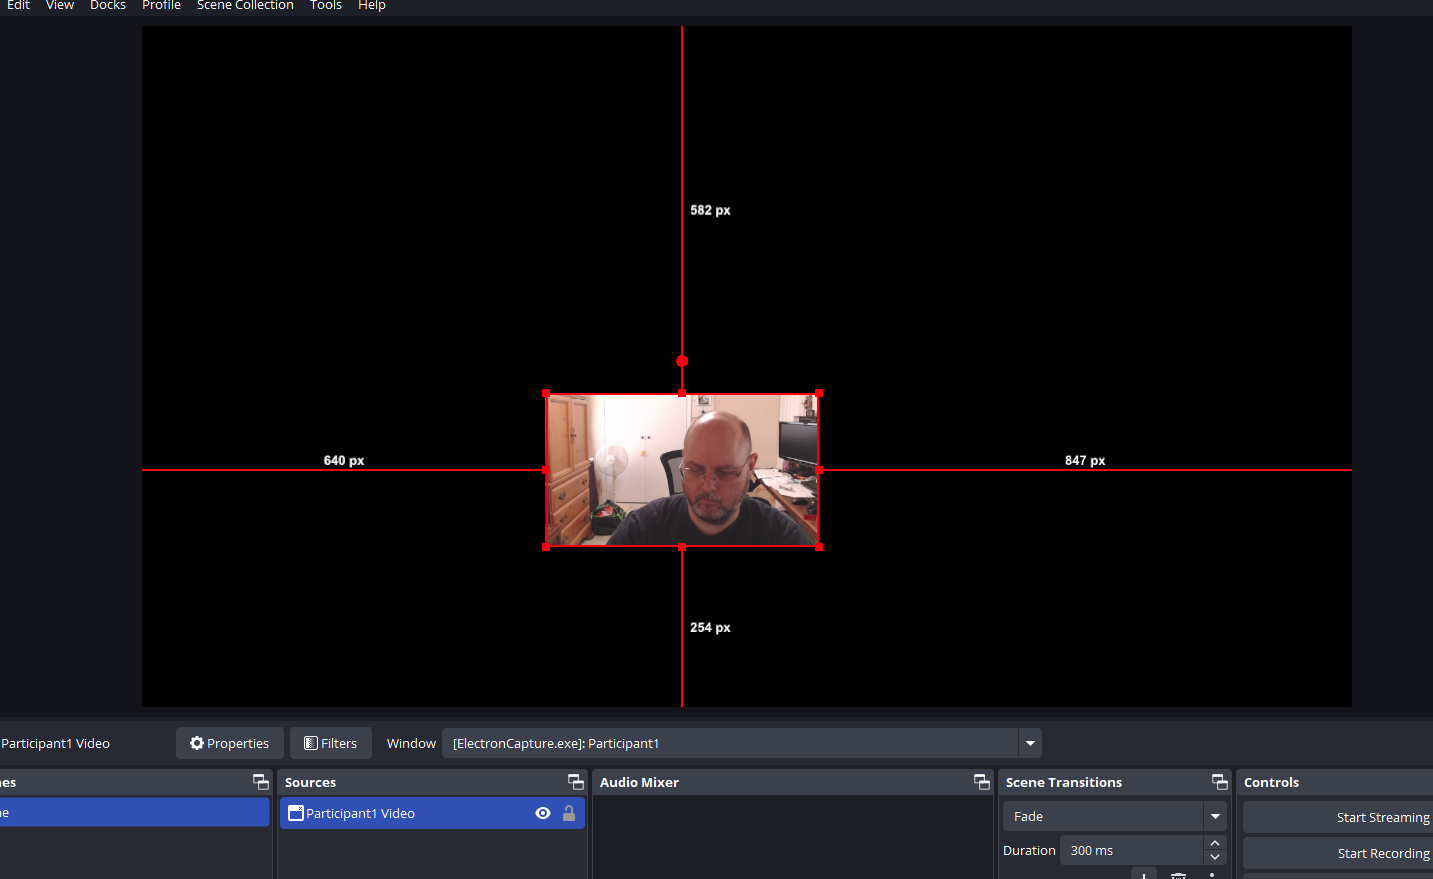
In OBS, the window capture can be placed anywhere in the scene and resized as needed.

